


Description
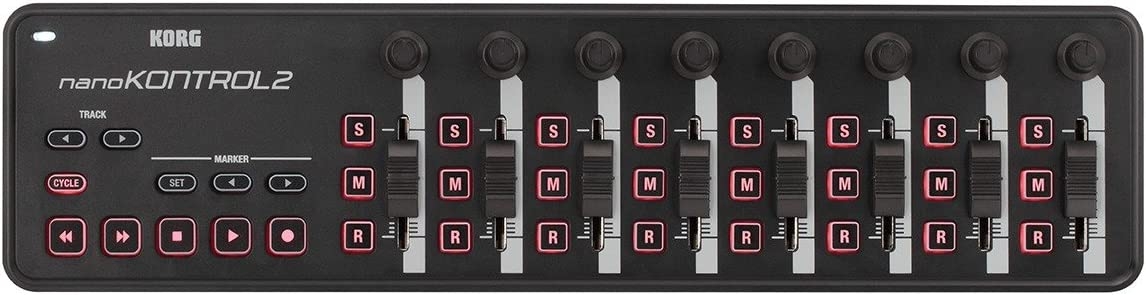
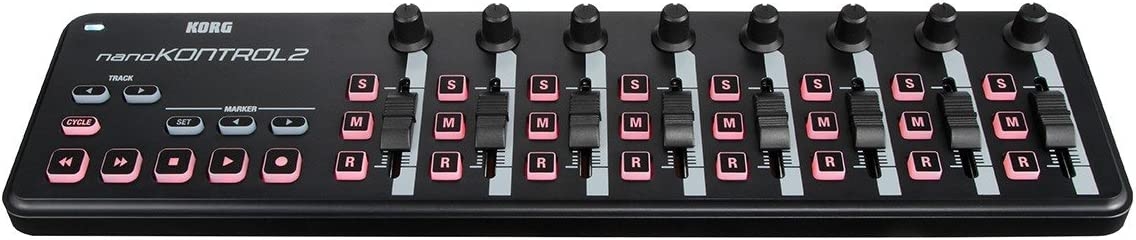
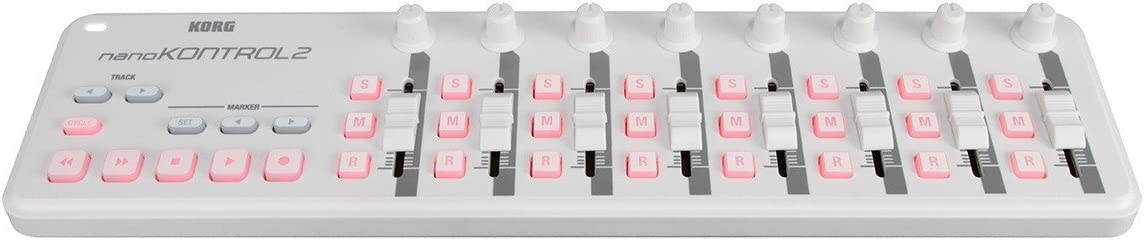
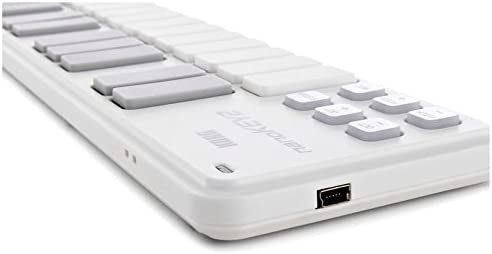
N A body proportioned to fit perfectly in front of your laptop computer, The Nanokontrol2 provides eight channels of the controllers you need to control your music software. The Nanokontrol2 also features a dedicated transport control section. The buttons have been carefully selected to be useful with your software, ensuring simple and intuitive control. Many software titles – including major DAW programs – are supported, dramatically reducing the need to make complicated connection settings. A knob, fader, and three switches are provided for each of the eight channels, respectively assigned to pan, volume, and solo/mute/record. This arrangement is a real convenience when recording automation for multiple channels. There’s also a marker button, making it easy to assign marks at important points in your song for more efficient recording and song production. When using a software synthesizer, you can assign parameters to the desired controllers for easy control. For example you could use the faders to control the ADSR of an envelope generator, and use the knobs to control the filter’s cutoff frequency and resonance, etc. The Nanokontrol2 works with the “Kong KONTROL editor” Software – available free on the Kong website. Load it into your computer, and use it to make detailed customized settings. For example, the minimum and maximum values for each control change message can be specified. Just connect a single USB cable from your computer to the Nanokontrol2, and you’ve got a quick and portable music production system. Power and USB-MIDI data travels down the same wire for a clean, efficient workspace.
From the manufacturer


Korg nanoKONTROL 2
Convenient, compact control surface, with easy setup for immediate use
In a body proportioned to fit perfectly in front of your laptop computer, the nanoKONTROL2 provides eight channels of the controllers you need to control your music software. The nanoKONTROL2 also features a dedicated transport control section. The buttons have been carefully selected to be useful with your software, ensuring simple and intuitive control. Many software titles – including major DAW programs – are supported, dramatically reducing the need to make complicated connection settings.
Complete control for your DAW or software synthesizer
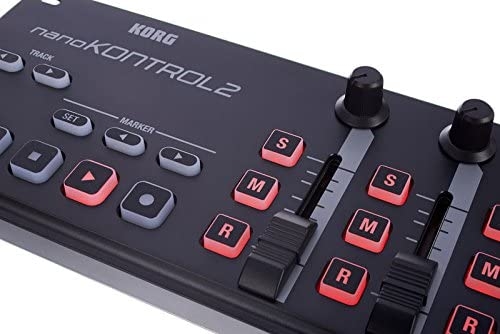
A knob, fader, and three switches are provided for each of the eight channels, respectively assigned to pan, volume, and solo/mute/record. This arrangement is a real convenience when recording automation for multiple channels. There’s also a marker button, making it easy to assign marks at important points in your song for more efficient recording and song production.
Features
- Low-profile, multi-function control surface
- New track select and marker advance parameters
- 8 Channels; each with three buttons, one fader, and one knob
- Dedicated transport control section
- Supports numerous software titles including major DAW programs
nanoKONTROL2 Features
|
|
|
|
|---|---|---|
Complete control for your DAW or software synthesizerA knob, fader, and three switches are provided for each of the eight channels, respectively assigned to pan, volume, and solo/mute/record. This arrangement is a real convenience when recording automation for multiple channels. |
USB power for an uncluttered setupJust connect a single USB cable from your computer to the nanoKONTROL2, and you’ve got a quick and portable music production system. Power and USB-MIDI data travels down the same wire for a clean, efficient workspace. |
Korg Kontrol Editor softwareThe nanoKONTROL2 works with the “KORG Kontrol Editor” software – available free on the KORG website. Load it into your computer, and use it to make detailed customized settings. For example, the minimum and maximum values for each control change message can be specified. |


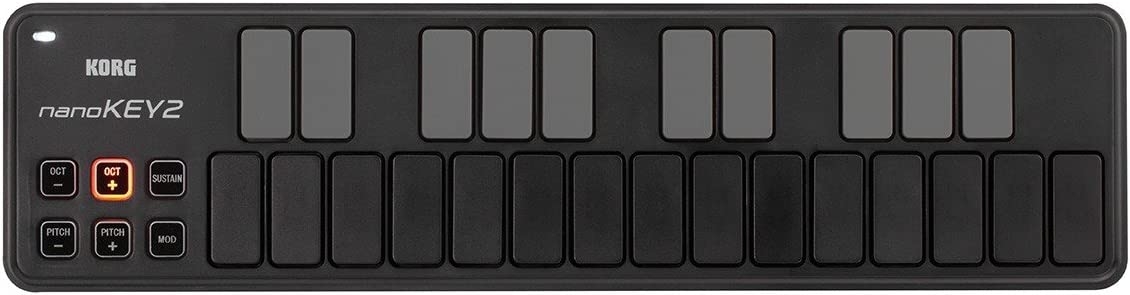
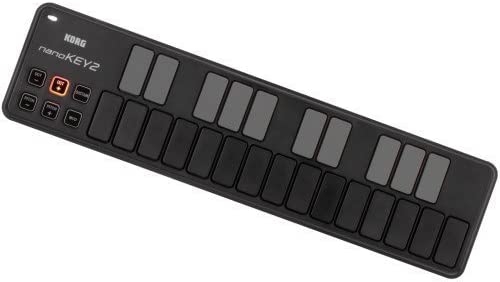
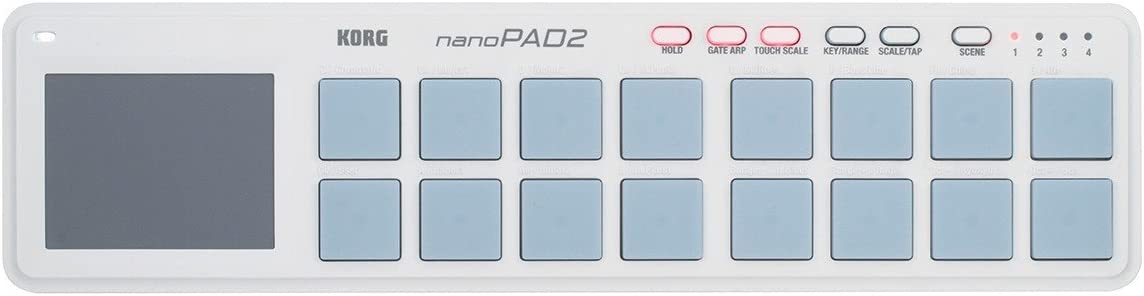
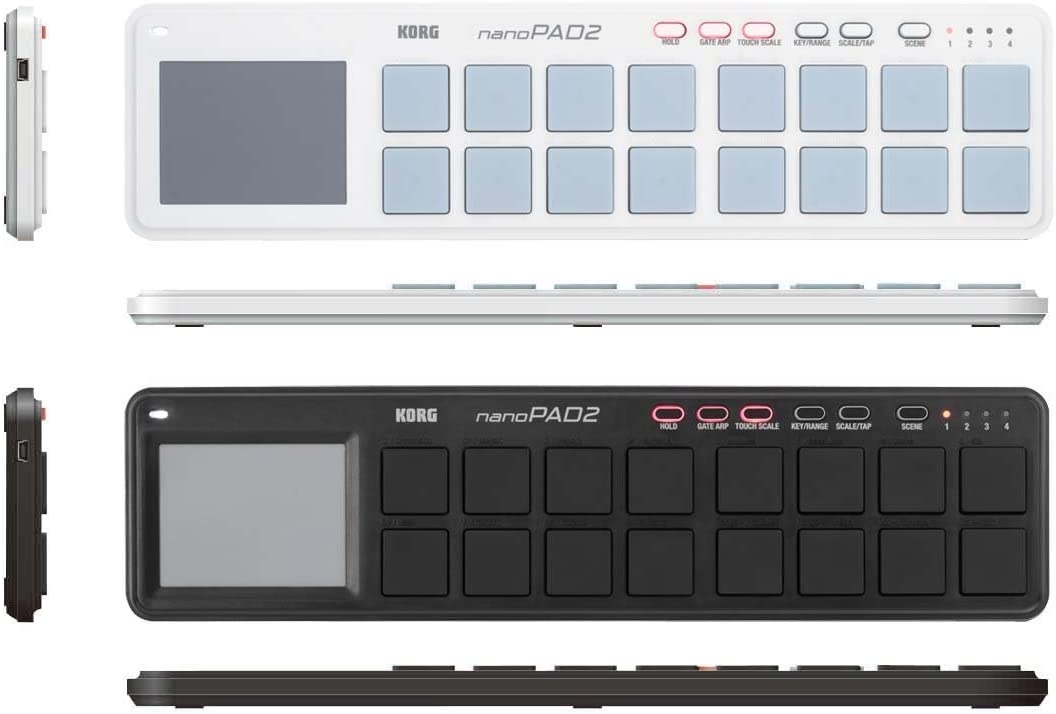
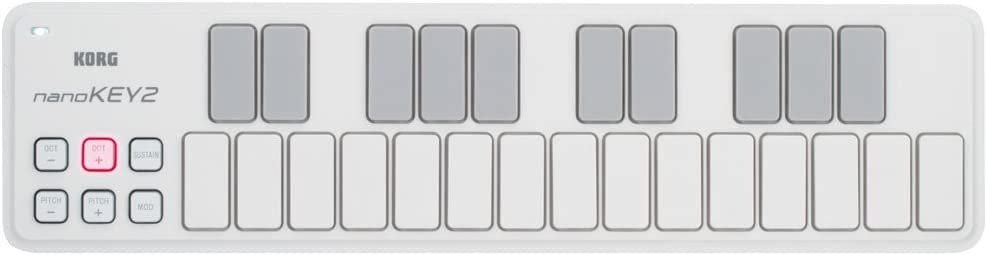
nanoPAD2

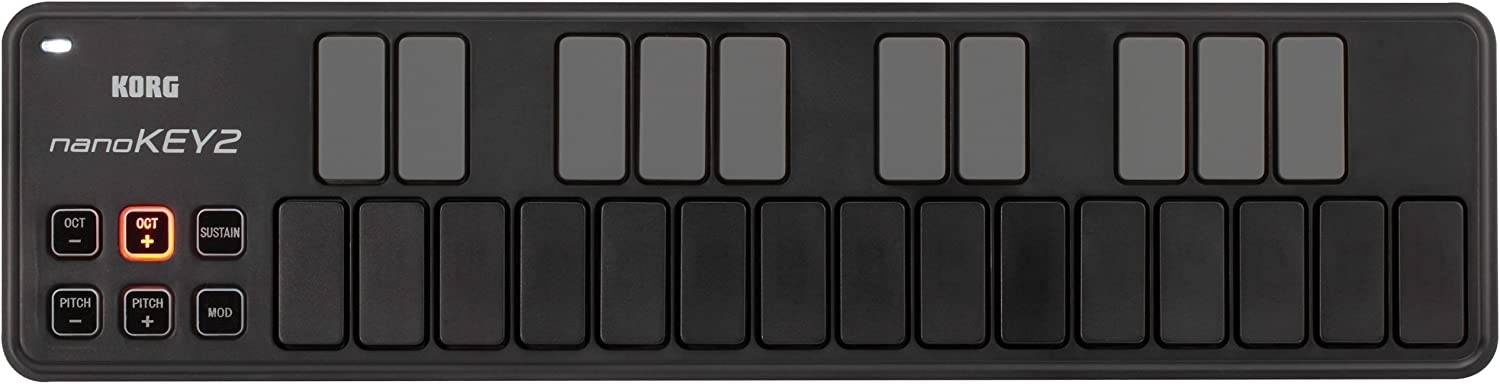
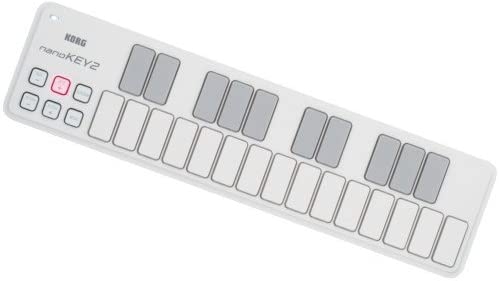
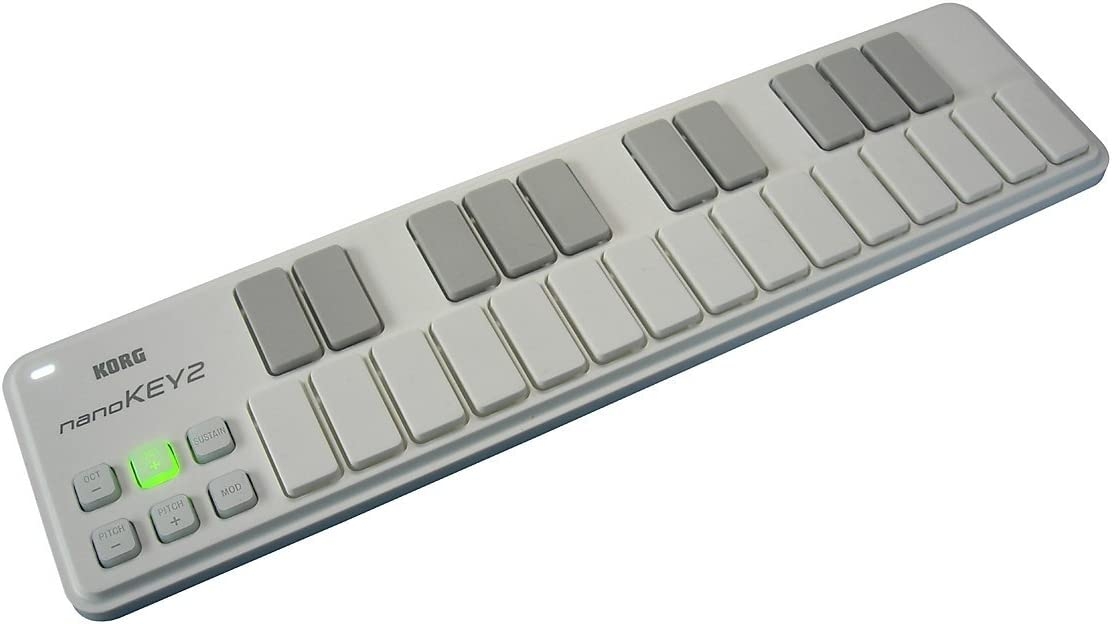
nanoKEY2

microKEY Air 37

nanoKEY Studio


J.R. –
It’s all right for PC-based setups, but…I’ve had this a couple of years now. It has spent most of its time back in its box because it mostly does not suit my needs. I own a lot of Korg gear, and this is the only Korg thing I’ve bought that I wish I hadn’t. But first…The pros:1. It’s solid. You can smack the heck out the pads and not worry about it breaking.2. It’s ultra lightweight and will fit into a large handbag, backpack, laptop case, nor will take it up very much space on your desk.3. You can hit anywhere on the pad, such as the barest smidge of a corner and the pad will work.4. If you own a Korg Kronos, and I do not, you can connect the NanoPad directly to the Kronos via the USB port and the NanoPad will work without a PC or Mac in between.5. The pads can be configured on a per-pad basis, meaning some pads can send out note/velocity data, other pads can send out CCs (see also the cons below), and some more pads can send MIDI program changes, along with each having the ability to be a momentary switch or a toggle switch, all within one scene. In addition, each pad can send up to four notes, CCs or program changes at once. All of that is pretty decent and worth the price of admission. You can also enable or disable the Gate Arp/Touch Scale options if those features appeal to you. The X-Y pad, too, is configurable with the software, and you can choose between pitch bend or MIDI CC transmission on either axis. You can set both to CC if you want. There’s not much point to sending both to pitch bend unless your pad swiping skills are messy, because the pitch bend on both axes is not additive, and you can only pitch bend one whole note anyway.And that’s about it for the pros.The cons:1. The velocity sensitivity of the pads is spotty at best. There are only three velocity curves available plus one constant velocity value option in the Korg Kontrol software. To get the most sensitivity out of the pads, you’ll want to choose the “Hard” curve option. If that doesn’t seem much different to you than the other two curves, you’re not alone. With the absolute lightest touch I can manage, the pads typically send out velocity values between 5 and 45 on the hard curve. That isn’t particularly expressive and you will struggle to play with any kind of nuance.2. You’ll need a computer and some kind of DAW or other MIDI software like MIDI-OX for this to work (unless you have a Kronos — I don’t know if the new Korg Nautilus will work with it straightaway). This is the most annoying thing for me. If you don’t work ITB (in the box, i.e. on a computer), then you’ll need to get a USB MIDI Host, and those cost between $50 to several hundred dollars. I do not recommend buying a NanoPad if you plan to work DAW-less, because why spend more money on a USB Host just to get your NanoPad to work with your gear? If you already have lots of class compliant controllers and a USB MIDI host, then getting this might be OK for you. If Korg ever updates the design of the Nanopad, I hope they consider adding some 3.5mm MIDI jacks like what you get on a BeatStep Pro.3. The X-Y pad. While the Korg Kontrol software lets you configure the pads on a per-pad level differently in its four different scenes, the X-Y pad can only be configured on a global level, which carries over from scene to scene. That limits its functionality greatly. When the X-Y pad is configured to send out CCs on either axis, the pad becomes unipolar on that axis. It would be better if it let you specify unipolar or bipolar behavior for CCs, along with giving you two CCs per axis (to work like a Korg joystick controller). There is also no option for each axis to send on a different MIDI channel, the pad can only send on one channel. There is a Touch/Release mode that activates when you simply touch the pad, but I don’t find that particularly useful for me. It might work for you. Finally you can’t set the amount of pitch bend the pad will do (unless I have missed that option somewhere).4. There is no aftertouch (AT) on the pads. For the price of this, that’s fair enough, but it would be nice. If channel or polyphonic AT is important to you, get another pad controller that does it.5. When the pads are set to transmit CC data, they can only send out a full data value of 127. You cannot configure this to send out a certain value to be used as a threshold value for instance, or to respond to velocity as input. That’s a shame, in my opinion. This severely limits the usability of CCs on the pads. But you can set a threshold value on the X-Y pad when in Touch/Release mode. You can forget sending out any kind of NRPN to your gear too.6. It’s lightweight but the rubber feet don’t hold the NanoPad in place very well on some surfaces, like aluminum on a keyboard panel for instance. I use a piece of non-slip shelf liner to keep the NanoPad from moving when I use it.Summary: If you’re looking for a decent, basic pad controller to beat on indiscriminately, and you don’t mind working via your computer, then this might fit the bill for you. If you’re looking for nuanced play, a full MIDI spec implementation and tons of configuration options for controlling your extensive MIDI gear, then you’d be better off spending a bit more money on a pad controller or sequencer with pads. After trying to get on with this thing for a few months, I ended up getting a BeatStep Pro instead for the finer pad work, but I do use the X-Y pad on the NanoPad for pitch bending one of my synths.
Robert Grupe –
Love, Love, Love: Mobile PracticeThis product is fantastic and the only option for highly portable keyboarding practice!Just connect the USB cord, and you are ready to play with a smartphone, tablet, or computer without the need for any further power source connection!I have been looking for a portable keyboard that I could use to practice anywhere: sitting on the couch, on airplane flights, waiting around somewhere, outdoors, etc.I wanted something that would fit in my computer bag, and would with my mobile phone so I couldn’t need to wrestle with the extra room needed for my laptop.THE PROBLEM WITH MOST OTHER SMALL MIDI KEYBOARD CONTROLLERSThey have mushy plastic keys that are prone to snapping off over time (do a web search to see repair problems. * I didn’t want the frustration and cost of trying to fix or replace every few months.* They also require powered USB connections; which, for some laptops and tablets, and any smartphones, requires an additional USB powered hub connected to an electrical outlet or battery pack. I didn’t want to have a snarl of wires and a third box to balance on my lap.AWESOME REVOLUTIONARY KEYBOARD LAYOUTIf you aren’t already fluent in playing scales and cords with correct fingering, this is a fantastic training aide.At first I found the layout difficult to play in certain scales and chords, but then it slowly dawned on me that it was due to my incorrect fingering (e.g. trying to use my thumb to play black keys). When I tried using correct scale fingering, then problem solved![If you don’t know the correct hand fingering to use for each scale, do a web search ‘piano scale fingering’.]Practicing with the nanoKEY, it will force me to break my bad lazy habits for melody lines, runs, riffs, and chord inversions.THE KEYS ARE QUIETI had seen some review comments that they keys were noisy and therefore would be distracting to others in quiet settings.I decided to take the risk of ordering it anyways, and I am very glad that I did because I found that this is not the case.People sitting next to me in normal ambient environments will not hear anything from the nonKEY2. It is same noise level as my touch typing on a MacBook Air laptop computer- or quieter; it all depends on how aggressively or smoothly someone hits the keys.If you like to bang away your keys, then yes, you will annoy others in very quite places. But really, do everyone around you a favor and just STOP IT ALREADY! Learn to play (and type) with finesse and skill instead.TIPS FOR SUCCESS* Understand that any midi devices may need some system setting adjustments on your smartphone, tablet, or computer. If you’ve never used a midi keyboard before with your device, it might not just plug-in and work right away until you enable midi via USB.* Understand that the music software you want to use needs to be configured to use a midi connected keyboard. So you will need to check user the help and settings.* If your music software device doesn’t have a full-sized USB port, you will need to an adapter.* When playing along with other software (e.g. Spotify, Worship Team, etc.), you may need to turn your midi music software instrument (ORG 2020, etc.) volumes to maximum.WHAT’S MISSING?* Foot pedal input for sustainThis would be important for actual two handed playing performances or recording, but not necessary for highly portable practice or composing.To use a foot pedal would required another item to be transported and stable floor space to use it.Instead, get and use a separate tabletop midi keyboard that has full size, velocity sensitive, weighted keys.* Korg software bundles for AndroidNo specific software isn’t needed to use the nanoKey, but many new-player potential customers may not realize that. In the box is a license code that can be used for limited version of software for iPad/iPad, Windows, and Mac, but nothing for Android.Korg is really missing a large market opportunity by not addressing and promoting to Android users.MY SETUPS WITH nanoKEY2* Smartphone: Motorola X4 running Android v9 + Android music apps (free versions of ORG 2020, Caustic, Perfect Piano, SymprezFM) + USB C adapter* Laptop: MacBook Air + Garage Band
bvalentine –
Better than expectedI wanted something discreet for my desk at work and something that fits in a computer bag. I’m a hobby audio engineer and professionally edit videos. I have better keys at home but this works fine for the office. I’m surprised at how easily I adapted to the keys. If it had one more octave I could really play this thing, but then again I purposely wanted something this small. This shouldn’t be your main set of keys, but if you just want something quick and portable, this ain’t bad. I’m mainly using it in Logic Pro and Arturia. I didn’t need to download anything. Sometimes I have to unplug it and plug it back in. Other than that, works fine.
Eric Cates –
You may need a script to use thisI use fl studio 20 and the native script for this controller doesn’t work properly. There are tons of videos on how to fix this along with the correct script. Incredible value and comes with a ton of free plugins! I’m very happy.
j.hexx –
worth the 59.99 i spent on it! i use it with Reaper 3.76.I recieved this in the mail 2 days ago, and i must say i am totally impressed with this unit. I programmed Reaper 3.76 using it’s Midi CC message mode, and it took time using the action option in Reaper to manually program the NanoKontrol 2, to use it as the transport and mixer functions of the daw. Once i set it up (i got it programmed to 24 faders and pan knobs, plus all solo/mute/record arm buttons and the full transport as well using 3 out of 16 availiable midi channels! But if you like you can max it out at 8 tracks per midi channel, up to 16 midi channels giving you a max of 128 channels/tracks!) it worked smooth as butter. The pan knobs feel really good and not cheap, the faders have a nice feel of resistance to them like mixing boards do. The buttons light up when they are armed to toggle, i am very impressed with the quality of this unit.The pros to this unit is that it is definitely a step up in the construction and build quality of this unit compared to the version 1 of the NanoKontrol. The added transport functions are great , all the solo/mute/record arm buttons, as well as the transport buttons don’t feel cheap at all, and feel solid which is a big surprise granted the cost of this unit (59.99 as of 7/3/2011). It has a decent weight to it, around 3/4 of a pound. It looks cool too during use in a session. The controls are very responsive with Reaper 3.76. I use this controller with it’s Midi CC Message mode.The cons i have is that the scene button from version one was removed, and instead is now a part of the Korg Kontrol Editor, a program you get from the Korg website after you purchase the unit, and this program allows you to set the functions and switches, from monetary press to toggle mode, as well as set the seperate midi channels (midi channels 1-16) to switch between 8 sets of tracks(per one of the 16 midi channels you can select in the Korg Kontrol Editor) you program the NanoKontrol 2 to use. In order to switch between the midi channels, you must open the Korg Kontrol Editor and write the scene to the NanoKontrol 2 for every time you need to swtich between midi channels in your daw. The Korg Kontrol Editor doesn’t take too long to load to make the changes to your NanoKontrol 2, so it isn’t a big deal but some might have preferred the scene button on the device itself. But it doesn’t bother me much so i like it as is.And if you have no idea how to program midi cc messages to your controller from your daw, it might frustrate a few folk who might see programming midi into a controller a bit frustrating at first. This was my first time ever programming any controller using midi cc messages from Reaper’s built in Action Option window, and once i understood how it worked (took me from openeing the package and programming the actions for up to 24 tracks of faders/pan knobs/ solo,mute and record arm buttons, plus full transport controls took me about 2 hrs tops) it was so easy to program, and i got it after seeing how it worked!The second con is the version 1 of NanoKontrol had 9 faders instead of version 2’s 8 faders. I wish they would have kept the 9th fader, due to the fact that the 9th fader could have been used as the master volume track and that would’ve been great. But for what i paid for it, and for what it is worth, i have to truly say the cons aren’t so great to me, that it makes me regret my purchase. Matter of fact i will say that this is the best 60.00 i spent on a cheaper piece of gear and i would totally buy another one, that is how great this daw controller is.In short, it is worth your 60 dollars, it has a sturdier build than the first version, it has a nice feel and good resistance on the faders and pan knobs and all toggle switches feel durable and better quality than the cost of this unit. I would HIGHLY reccommend the NanoKontrol 2 usb/midi Daw controller for your home studio, and even pro studio use.
Mr. Mark. –
Korg Nano Pad II Short Review. By DJ.MGSHi allBought the Korg Nano pad II, to help out with my DJ’ing, I also run the Hercules 4mx controller with VDJ 8-Pro, and the Nano pad needed to be re-mapped, after a Skype call and talking with the fellas @ auto mix Products, we both worked on the Mapping code, and even re wrote some of it, the Nano Pad II works floorlessly. After a few tweak’s, we even got the X/y pad to effect the deepness and width of Whatever effect, Via re-mapping the P1 and P2 controls, Also Note that the Nano pad II also has a “Scene button”, so infact, you have 16×4 banks (of pads) that you also can re-map to whatever you need to EG trigger off Loops, Cue points, Samples EfX etc, whatever you wanna re-map.It is a solid unit and the price was right, however, none of the pads have back lit LED’s, So you really got to watch the screen to see whats triggered when you fire things off, Hopefully the Korg Nano pad III will have back lit LED’s built into the pads… Nano pad 3 ideas fellas…You also need to set Limits on the P1 and P2 controls, or they will go out of Range, and then you run into audio issues. the Nano pad II has 6 padded feet on the bottom so it don’t Slip n slide all over the place.The Nano pad II is only about:1/2 inch tallby:12 inch and: 7/8th Longby: 3 inch: 3/8th Wide, so it is very compact indeed ;).I also stuck clear tape over the pads so i can mark what they are used for that way, the tape can be removed and no INK makes left behind also did the same as a separator if you look at my pic below, you will see a Black Line right in the middle, one part controls the “whatever effects” for deck “A” while the other half controls “whatever effects” for Deck “B”all in all i give this unit a 8/10, if the back lit LED’s in the pads, I wold give it a 10/10..NOTE I have set the Nano pad up and it works with VDJ 8 Pro, I do not “own any other DJ Programs such as Traktor” so please don’t ask for the code sorry, However I do have the code for VDJ 8-Pro..Pros:1. Small and compact. Works off USB with low consumption Power.2. Use’s USB “A”-mini connection.3. Has X/Y pad to control the P1 and P2 controls.4. Has 16 pads laid out, that can expand to 64 pads via the Scenes,5. Light weight.6. Remap-able.7. LED Status light.8. includes the USB Cable.9. Super fast delivery. no dings scratches or banged up A+++.10. Works with VDJ 8-Pro. (so I am happy)11. Downloadable software to test out the pad. its very Basic..Cons:1. No Back Lit LED’s in the Pads so you have to watch the monitor for whatever effects you use as long as you map it.2. Background lettering that’s molded into the unit is hard to Read White on White? really duh.3. * Mono color LED’s RED (Scene’s) and 1 Status LED White, not sure if that’s a con or pro yet…Note: Mapping is a bit tedious however, I did find a Map App (if you will) midi mapping app, that allows you to see the Nano pads code in action and you can Build your map out the way you like it. Google “Midi Trace” it will work for almost anything Midi/USB..Tip:Before doing any work, for installing the Nano pad, you need to instal its “Driver” for the Korg Nano pad II, and get it recognized by your system first.Thank you and enjoyDJ.MGS
ViciousXUSMC –
Good All Around Mini Controller – Knobs are NOT Infinite Rotary!-=Korg NanoKontrol 2=-First my gripes:I read the reviews and looked at the Q&A and somebody specifically answered a question about the knobs if they are infinite rotary encoders. They said yes, but the answer is NO! they are not they are limited range pentameters with a range from about 8 O’Clock to 4 O’Clock.Other gripe, the faders feel kind of cheap but they are functional.Now for the stuff I like:Plug and Play – It has several pre-set modes that you can load upon power on by holding a key combination, but most of all is the fact that you can download software to change the pre-sets or customize as needed.I like the ease and capability of using that software, and that ease of use and customization is the main reason I am keeping this unit around.Also the number of buttons, knobs and faders is really good.One strange thing about the unit is that in its default mode (CC Mode) you can see each and every buttons CC value and easily change it in software. Not just CC values but you can assign notes as well to the buttons.Then you change it to a different “mode” (Cubase, Digital Performer, Ableton Live, Pro Tools, Sonar) and suddenly for some reason the Kontrol Editor software will no longer let you change, or view the values each of the knobs, buttons and sliders have.This is just really strange as some of the other modes give control messages like pitch shift that you can not customize in CC mode. So the unit is capable of sending all sorts of commands but you can only customize a select few, and of all the modes while you can change them on the fly, you can only customize and view the values of the CC mode.This just doesn’t make any sense and is clearly just an implementation restriction not a hardware restriction.If the right person saw this they could easily open up the software to show you the values for all the modes and allow you to change the values for the board to be extended beyond just CC and Note values making this even more versatile and capable than it is now.Overall for my purposes it works really well, but I did want infinite rotary encoders so if I had known this ahead of time I might have gone with a different product.
StormJH1 –
Not a keyboard, not a sample pad, but a good, portable marriage of the two for on-the-go sketchingLots of reviews already for the Korg nanoKey2, so I will try to keep it short… This is my second MIDI controller – my first is the excellent Akai MPK25 (version 1). If you are primarily a keyboard player and are okay with the fact that the MPK25 is literally twice the size of the nanoKey2, then I think the Akai is a better option for a more traditional feeling keyboard and sample pad pairing. (Note: it’s also more expensive, retailing around $100, so perhaps not a fair comparison).But I like the nanoKey2 as the ultimate portable option for capturing ideas on-the-go on my iPhone and/or iPad. Since it’s smaller than a USB computer keyboard, you can slip it into a laptop case with the USB Camera Connection kit and the (included) USB cable, and you have everything you need.This does not have the traditional feel of a synthesizer keyboard. The buttons are velocity-sensitive, but they do not have any real travel or “spring” to them. They are more similar to a computer keyboard response. The downside of this is that if you are a traditional piano player and accustomed to playing complicated passages knowing exactly where the keys should fall under your fingers, you may struggle to do that here. But there are definite advantages to Korg’s design choice as well. First of which is that buttons can be pressed in rapid succession, unlike some piano keys. So if you are planning to use this keyboard to tap out rhythms, it’s capable of hitting 16th notes or triplets in quick succession, arguably better than a traditional keyboard. Also, some reviewers remarked that they actually found it easier to play the black keys (sharps and flats on the upper row) with this type of slimline keyboard, versus a shrunken-down version of a traditional keyboard. There may be some truth to that – it’s nice that all of the keys are of uniform size and feel.At the end of the day, I think the nanoKey2 is well suited to do an adequate job across a variety of needs, ranging from simple monophonic passages, playing simple chords (and recording them as MIDI data), and tapping out beats. It’s not going to be the best tool at any of those things, but certainly an improvement on a small touchscreen device. MIDI data editing and quantinization should also help to clean up some of the minor errors you commit using this type of input device. And, best of all, it’s extremely affordable and about as small and lightweight as you could expect. The best controller you have is the one that you actually have with you when you need it, and Korg has made a device here that is actually practical enough to carry with you just about anywhere.
Richard S Craddock –
Good product – tricky setup (on Windows, using ProTools) – helpful tips enclosed.I’m adding a review in order to address a set-up issue that I had with the nanoKONTROL2. I hope this saves some people some time.I just got this product (shipped free in one day – yay Prime!), and so far I’m happy with it. It’s small and light, with decent build quality, and ultimately works as expected. However, I had trouble setting it up.I wanted to use the nanoKONTROL2 with ProTools on Windows, mostly to have a dedicated transport control, but also for the faders, etc. Here are some tips:1. Get the latest drivers from Korg (http://www.korg.com/us/support/download/product/0/159/#driver), and install the Korg Kontrol editor software2. Check to see if the device is recognized by the Korg software:2a. Open the KORG KONTROL Editor2b. The editor should automatically recognize the device, and list it in the opening screen. If the devices is not listed, or listed as “not connected” then you may have the same problem that I had. Here’s how to fix it.It turns out that the KORG software won’t recognize the nanoKONTROL2 if it was installed with a MIDI device number higher than 10. So, you need to free up a lower MIDI device number, and re-install. Here’s how:0. Unplug the nanoKONTROL1. Close the KORG KONTROL Editor2. Open the program “Uninstall KORG USB-MIDI Device” (I know, this sounds unintuitive)3. Check to see where the nanoKONTROL is installed. If it’s higher than midi9, then that is likely causing a problem4. You’ll need to remove some devices lower than midi9. Click on Option, and uncheck “Delete KORG MIDI Device only” in order to be able to remove non-KORG devices. Select devices you are no longer using in order to create a blank spot lower than midi9. Also, go ahead and delete the nanoKONTROL device.5. Quit out of the KORG MIDI Driver Uninstall Utility6. Plug the nanoKONTROL2 back in (remember to hold down SET MARKER and PLAY buttons to put it in Pro Tools mode, if you’re using Pro Tools). This should cause Windows to reinstall the device, and it should choose one of the lower midi device numbers that you just freed up.7. You can launch the KORG KONTROL Editor again to check if the device is recognized.After that, set up in Pro Tools is straightforward. You can find instructions for making it work with ProTools in the documentation that comes with the device or with any search. Briefly:1. Hold down the SET MARKER and PLAY buttons when you plug in the device. That puts it in “Pro Tools” mode.2. In ProTools, go to Setup->Periperhals; go to the Midi controllers tab; select HUI as type, and NanoKontrol for the portsThat worked for me, although it took me a bit of time searching around the Internet to figure out the issue. Hopefully, this saves some folks some time. Good luck!
jack wilinsky –
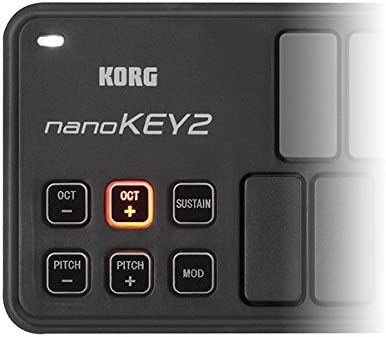
Unique among compact midi keyboardsWhat a great little keyboard this is! If all you want is basic keyboard input to your DAW(digital audio workstation) and you want something compact, this is a great choice. Many musicians complain (with good justification) about the feel of many midi keyboards, especially inexpensive ones. They often feel like toys. Most of them make an attempt at reproducing the feel of expensive equipment, even the feel of a real acoustic piano(you know, the kind with strings!), but they often fall short. This is especially true of compact keyboards. Korg came up with a great idea to get around this problem. They completely abandoned the idea of reproducing the feel of the traditional keyboard and went with a different concept. This is the result. It is probably the most compact, light-weight 25 key midi on the market. The feel is unlike anything else. The keys feel like a cross between a pad and a key. They have very little vertical travel, but still maintain well controlled velocity sensitivity. In this way, very fast fingering can be attained since your fingers don’t move vertically very much. The less the fingers have to move, the faster they can perform. Another significant feature is that the “black” keys have the same feel as the “white” keys since each key is like a separate pad and does not pivot(the black keys on a piano are shorter than the white keys and since they pivot, they have a different feel from the white keys). I really like that. You don’t have to hit the black keys harder to get the same velocity value as you might with a regular piano type key. Let me put it this way: you will either love this new feel or hate it. If you are the type who doesn’t like learning new feels and techniques, opt out of this keyboard.The buttons controlling octave location also have a nice feature: they go through several color and lighting modes for each octave change. That includes two shades of red, green and finally flashing. Very impressive. Editing control software is also included as are some nice free plugins. Some of those plugins require a maze of links and codes to obtain, which can be a bit daunting for the beginner, but you should be able to stumble through the process.Let me also remind you, especially you beginners, that midi devices must be plugged into the computer(and wait for the driver to load) BEFORE you open your software(DAWs). If you plug it in afterwards, it will not work. This is the most frequent error people make(even pros make this error at times!).For the price and all the innovations, this is a great choice in compact midi keyboards. It is one of my favorites.