Video Gallery
Table of Contents
ToggleThe Video Gallery of PTZ Cameras is appended below:
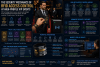
1. Meet Hikvision’s Next Generation PTZ Cameras
2. PTZ Cameras: What They Are, And When & How to Use Them
hey there everyone this is Doug with b h on any shoot you need a few things to get the job done a subject a camera and an operator and the more cameras you have the more operators you need well that is of course unless you have PTZ cameras PTZ cameras are motorized cameras that support panning tilting and zooming it's in the name all from a remote control and in many cases you can connect multiple PTZ cameras to One controller and have just one operator the setups can be as simple as one camera and controller or several cameras working together in concert with a switcher to produce a true multi-camera production so let's dive into the world of PTZ cameras what are PTZ cameras PTZ cameras really means any camera that supports pan tilt and zoom functionality all from its own motorized enclosure now thanks to their all-in-one nature they're ideal for Live Events houses of worship live streaming discussion panels concerts and conference rooms really any place where you need camera control and are maybe short an operator or two ptcs also excel in any area where you would perhaps use a traditional smaller sensor video camera though this is actually changing as PTZ cameras like Canon crn 500 for example use a one-inch sensor and can provide a bit more depth in their image now typically PTZ cameras offer a wealth of connections and for good reason video feeds come in the form of an HDMI my SDI or more recently the ndi protocol but there's also the need to connect the camera to a controller or network usually this is done either through an RJ45 connection which doubles as a network ethernet port though it sometimes comes in the form of a serial connection such as rs-422 there's other connections depending on the PTZ camera you choose but we're going to take a look at that in a bit for now we're going to rewind a little and head over to bnh's NAB 2022 Booth where we got to see a three camera PTZ setup in action all controlled powered and connected with one cable alright everyone so behind me you can see is part of the b h NAB booth for 2022 they've actually got quite an installation here but behind me is the ttz setup and it's all set up over ndi exclusively for video power and control and it's just one of the ways that b h is able to set up such installations so come with me we're going to take a look at what they've got going on we've got a whole truss here three cameras that feed into the switchboard over there now starting from the left over here we have one Canon crn 500 and you can see there's just one cable coming out the back this is an ethernet cable it is set for ndi video and it goes right up the truss across and feeds all the way down now moving over a little bit we have this middle unit here this is rigged upside down so of course we have this configured to shoot upside down out ndi to the switch and the last camera the third one that we have here same model again on an arm totally flexible but again this is just going right down over into the setup over here and everything is controlled via this tricaster switcher you can see we have all the multiple angles right over here they've been testing switching through the day it's actually pretty much all set up so we're just tidying things up but everything is controlled exclusively through here one cable so for the setup today we're relying primarily on the Canon crn 500 PTZ camera this is a one-inch CMOS sensor camera so great 4K image very clean very sharp good color and it's even got Canon's dual pixel autofocus so shouldn't have to worry about keeping things in Focus now it's got a 15 times zoom lens on there which is great because we're doing presentations across all of NAB so that means of course we're going to want nice close-ups wide shots of the entire panel this should get the job done now we did mention the ndi coming straight out that's ndi HX built-in support but there's also HDMI and 3G SDI support as well if you want to go the more traditional way now talking audio if you've got a simpler setup audio is of course handled separately here but for this there's dual XLR inputs so you can get for example board sound or a separate microphone going straight into the PTZ camera and if you're doing a small event that takes care of pretty much everything so what do you need to add PTZ cameras to your production well aside from the camera itself I'm going to stick with my favorite piece of advice no matter what I'm talking about consider the needs of your production if you're doing a very simple single camera shoot in a small conference room and don't need sophisticated control a PTZ camera with its included remote control can probably get the job done but like I said that's a very simple setup for something closer to what we did at NAB you'll want to consider the following do I need multiple cameras and if so how am I controlling them now we use the tricaster setup which allowed control of the three cameras but also provided the video switch and control necessary for a multi-camera production you could however break these functions out into a separate switcher and controller Canon for example has their own rcip100 controller which can control up to 100 of their PTZ cameras with a touch interface and joystick you could then pair this with a simple switcher like the Roland vr1hd for example what signal type should I use while we used an advanced ndi setup to carry video control and power to the cameras this is by no means the only option at your disposal ndi or network device interface is a way to provide IP video that is video addressable from a network in a low latency form to compatible ndi switchers it basically means a single ethernet cable can carry your video signal as well as the controller and power signal provided you have the right Hardware but seeing as ndi is a whole other conversation I'll leave it at that your other options are more typical SDI or HDMI for more professional installations SDI is probably the way to go as it provides a locked stable connection and it's usually the interface you'll see on higher end switches or video streaming devices that said for something like the crn 500 4K video is only possible when using HDMI or when streaming directly over in an IP connection so if you want to produce a 4K video for your PTZ setup you have those two options or you could possibly even convert the HDMI signal to something like 12g SDI but that's actually a good place to bring up streaming if you've never streamed video before one of the most common ways to do so is over what's called rtmp or rtsp they're both protocols I won't get too specific here but in crn 500's case you're able to directly stream video to an rtmp destination which for single camera setups means you can directly operate and stream all from one camera capability is actually being extended to SRT streaming as well in the near future which opens up even more ways to stream high quality video straight out of the camera now when it comes to audio most multi-camera Productions would probably opt for a separate audio mixer to handle the job to then be combined at the switcher but for single camera setups it is possible to use the XLR ports or even 3.5 millimeter mic in Jack on the crn 500 with the audio then being embedded in the HDMI SDI or ipfeet so while this is a pretty brief overview of what you can do with a PTZ camera it should get you started and if you're big into live streaming or concert recordings for example they're honestly a great option to get the coverage you need also don't worry I don't want to put any camera operators out of business you can absolutely have multiple cameras that are operated by people and then integrate a PTZ camera for some additional coverage think a wide sweeping shot of a show or a fixed close-up of a Podium speaker as always the possible abilities are endless so that's it for now let us know how you've used or intend to use PTZ cameras in your next production in the comments below I'm Doug with b h and I'll see you next time [Music]
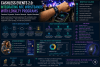
3. Hikvision 36x super zoom IP PTZ camera 1080p
[Music] what is a ptz camera it's become a buzzword in the tech industry but many people may not know what the term ptz camera means ptz cameras are pan tilt and zoom video cameras that allow an operator to control the camera remotely what does ptz mean ptz cameras can pan horizontally tilt vertically and zoom in on a subject to enhance the image quality without digital pixelation camera panning movements move horizontally across a space camera tilt movements move vertically up and down and zooming movements enhance the view from a camera with optical or digital zoom why use a ptz camera ptz cameras are ideal for video projects where you want to remotely operate a camera if you are multitasking using live streaming software or other recording applications camera operations can be automated using ptz cameras they're best to use when you want a single person to operate more than one camera or a regular camera just takes up too much space are there different types of ptz cameras ptz camera types are generally classified by their optical zoom and video output options optical zoom is a camera feature that allows you to enhance your image without pixelation as you zoom into an area video outputs are connections that you can use to bring the video and audio from the camera into your system ptz optics cameras for example come in 12x 20x and 30x optical zoom options and their video outputs include usb sdi and ndi connections what are ptz camera systems ptz camera systems are complete video packages with the ability to record and or live stream all necessary audio and video for any project ptz camera systems can be put together with any mac pc computer or dedicated hardware and they can include networking hardware to control cameras over an ip connection some even have an option to power the cameras using power over ethernet ptz camera systems may also include a ptz joystick controller and other video production control interfaces that's it for this back to basics video don't forget to subscribe to our channel because you won't become a video expert overnight and our channel is full of helpful videos to increase your skills and video production capabilities [Music] you
4. What is a PTZ camera?
5. IP Camera full installation ।। NVR camera full setup ।।ewc।। Ptz camera installation
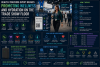
6. Hikvision PTZ Cameras – Highlights and Key Features
[Music] hikvision's ptz cameras secure large areas while getting great detail in diverse scenarios their powerful functions and environmental adaptability come from innovative design and engineering [Music] when the ambient temperature drops sharply water vapor inside the camera housing condenses on the cold lens glass the condensation will obscure imaging and prevent effective monitoring in order to minimize condensation hikvision ptz cameras feature a heatable film around the lens glass to balance the temperatures inside and outside when the temperature difference diminishes condensation will cease and images will remain clear in addition hikvision ptz cameras are equipped with an electric dehumidifier to further eliminate condensation inside the housing the dehumidifier electrolyzes the water inside the ptz cameras into hydrogen and oxygen and discharges the gases out of the camera housing when ptz cameras work outdoors they often have to endure adverse weather conditions the smart wiper on certain hikvision ptz camera models will sense moisture and rain and turn on and off automatically water repellent coating on the lens borrows a phenomenon from the lotus plant water droplets will not stick to the lens but roll off like dew on its leaf this is called the lotus effect all the adjoining surfaces of the camera housing are sealed with watertight rings all cable joints are glued to prevent water vapor from entering in hikvision's product testing center gas is injected into the ptz cameras testing the seals of the camera housing by observing the air pressure if the air pressure readings change only within a designated range it means that the tested ptz camera meets hikvision's high quality standards all hikvision ptz cameras must pass this air tightness test to achieve the ip67 protection level ptz cameras are generally installed in elevated positions with monitored areas and targets at extended distances the rapid focus feature allows the ptz camera to focus quickly after frequent zooming so that crisp clear imaging is always available when zoomed in the images of a ptz camera are more likely to shake under strong winds especially when mounted on an unstable pole optical image stabilization ois helps ptz cameras to always have a stable picture when a camera captures protected or prohibited content you can protect the privacy by adding a mosaic over the area such as the sheds in the lower right corner of this video even when the ptz camera is panning or tilting the camera maintains the mosaic over the protected area
7. Auto-Tracking PTZ Camera
Hey everyone. Mike from CCTV Camera Pros here. In this video, I'm going to demonstrate our new auto-tracking PTZ camera. It's that dome pan-tilt-zoom camera that you see behind me on the left. That's a Viewtron IP camera, and it has built-in artificial intelligence for object detection, and it also has auto-tracking software built in. What I'm going to do is I'm going to set up an intrusion zone out here in our parking lot, so that when the camera detects a human, it'll track them as long as they're in that intrusion zone. The auto-tracking PTZ camera is connected to one of our Viewtron IP camera NVRs. This is the live view on the Viewtron NVR. To set up the auto-tracking, I'm going to select Settings from the main menu and then go into Camera, PTZ. On the PTZ screen, I'm going to select Smart Tracking over here on the left. I only have one auto-tracking PTZ so it's the only one listed under Camera. And then, Tracking mode, you want to set PTZ Auto Tracking as a priority, then click Apply. Next, I need to go into the AI/Event section. The auto-tracking PTZ is already selected. And I'm going to set an intrusion zone, so I select Intrusion for the type of detection that I want to do, and then check this Enable Detection by IP Camera checkbox. Next, I'm going to draw my perimeter, and I do that just by clicking on points on the camera view basically to create a square, in this case, around our entire parking lot that is in the view of the camera. And then, you want to set this to Lock, the PTZ control is unavailable when the camera is in auto-tracking mode. And I only want to detect humans for this test, so in the Target Detection, I just select humans, and then I'm going to have it grab a snapshot and then I'm also going to have the NVR record on the PTZ camera whenever there's intrusion. I click OK there. If I wanted to, I could also set up a push notification, a buzzer, video pop-up, and email notifications, but I'm not going to do that for this test. I then click on Apply, and then I can close out that window and return to the live view of the camera. Next, we're going to actually do the demo of a human object detection and the auto-tracking. I'm going to click on the full screen view of the PTZ camera, and then I'm going to select Target Detection. What this does is this shows our intrusion zone that we drew. You could see the square there around the parking lot, and then it opens up that object detection window on the right. Whenever an object is detected, it'll show a snapshot there. One of our neighbors just came out, detected her getting into the truck there, and you could see the event was documented on the right. There's a couple better examples than that. She was kind of far away and didn't get a chance to move in close to her, but give this a minute. It gets better. There's going to be another human object detection right here, but again, he's too far out there and gets into the truck right away. The camera doesn't have a chance to zoom in and track him much. Just give this a second. One of the yard maintenance people are going to come around the corner and within a perfect view of the camera, and it does a really nice job of tracking them. Just give this a second. They'll be coming around the corner here any second. Here she comes with the lawn blower there, and watch as she comes into view, how the camera starts tracking her. She stays within the intrusion zone so now it begins tracking by zooming in, it's panning, it's tilting, it's zooming, it's doing all the functions, and it's going to track her across the entire intrusion zone. Now, that tree gets in the way and blocks her. She's now out of view, out of the intrusion zone, and she's gone. There's going to be one more example here in a minute. I'm going to pull up in my car. Just give me a second to allow that truck to get out of the way, and I'll be coming in within view within a few seconds here. I'm going to just speed up the video here for a couple seconds. Here I come. Now, if I would've also set it to tracking cars, the camera would've been zooming in and tracking my car, but remember, we set it only to human detection. When I get out of the vehicle, it'll identify me as a human. It's going to zoom in on me here and begin tracking. And I'm going to stay within view much longer than the other subjects there so this will be the best example. Notice because I entered the intrusion zone, actually, it tracks me beyond the intrusions zone to keep an eye on me the whole time I'm in view, not just in the intrusion zone. Once I'm detected, it'll track me as far and as much as it can. I'll just walk around to a couple more points here. And you could see it's doing a really good job of tracking me everywhere I go. That's the end of that auto-tracking demo. Next, I want to show you how easy it is to play back these recorded events. You could see the thumbnails over here on the right of all the events that were detected. And if you hover over it with the mouse, there'll be a play button that appears. When I click on that play button, the recorded video surveillance footage on the NVR begins playing at the time the event was detected. Here's the video playback of when I was detected by the camera and when the PTZ was auto-tracking me. And I'm not going to run through the whole thing. I just wanted to show you how easy it was to jump to these events and play them back. Play back the recorded video, that is. Let me mention a couple other things about this camera before we wrap up. The model number is IP-PTZ-425, and it's a 360 degree pan-tilt-zoom camera. This is an IP camera so it uses CAT5 cable, and it works great with our Viewtron NVRs. That's a Viewtron camera. It has built-in infrared IR night vision that's effective up to a 100 meters or 300 feet. The auto-tracking and the object detection can detect faces, it can detect humans, and it can detect vehicles. If you have any questions about any of this, please feel free to reach out to me anytime. I could be reached directly at mike@cctvcamerapros.net. If you want to learn more about this auto-tracking AI pan-tilt-zoom camera, please visit http://www.cctvcamerapros.com/425. Thank you for watching.
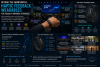
8. Intelligent Applications of Hikvision’s TandemVu PTZ Cameras
9. Using PTZ Cameras with vMix for your live productions and live streams.
[Music] hi everyone this video today is going to take a look at using PTZ cameras in a live video production now first of all I just need to address the elephant in the room against my better judgment I'm going to be using the American Z instead of the proper English Z so PT Z as opposed to PT said now you may have heard a lot of people talking about PTZ cameras and wondered what are they going on about what is the PTZ camera do I need that for my live production so hopefully in this video will help to answer some of those questions and show you how to use it in live video now as a live streaming becomes more popular PTZ cameras have also grown in popularity due to their functionality and their flexibility they are more expensive than your typical consumer or prosumer camera so keep that in mind when weighing up your pros and cons one of the cool features in vmix is the ability to actually control certain PTZ cameras directly from the interface which means it really adds to their functionality ok so PT Z is short for pan tilt and zoom and refers to cameras that allow you to control these aspects remotely without a camera person so traditionally cameras need an operator on them at all times but PTZ cameras allow you to control them completely remotely this makes them great cameras for small production teams that might not have the luxury of camera operators or for camera positions that are really hard to reach if you're using the IP stream or MDI from the camera you may also only need one cable as a lot of PTZ cameras can be powered just by using a network cable using power over ethernet or Pio II but keep in mind if you want to use peoe you would need a POS switch now perhaps the most common use for them it's just for productions that need multiple angles from cameras and zooms so they have a single camera or they have multiple PTZ cameras that allow them to create 10 20 30 different shots in their production there are also a heap of popular applications for using PTZ cameras a lot of people use them in house of worship where they might have a small volunteer team where they can have multiple cameras set up and multiple angles on those cameras as well we've used it in our studio before we have them set up now and they're really good for being able to just sit here at our desk and be able to control them without having to get up each time and control them a lot of people use them in sporting situations where they can set up cameras that are completely remote from where the controller or the production team is they can maneuver them around lecture situations where you have them at conferences in universities and schools they're really good for that as well so there's a a really wide range of applications for using PTZ cameras now PTZ cameras come in all shapes and sizes colors connections prices and quality just like normal cameras PTZ cameras can be assessed based on your production needs for example if you have a HDMI based production then you'll need a camera that supports HDMI output or perhaps you need a certain frame rate or resolution each camera will have a spec sheet that will let you know exactly what they do support in our office we have models ranging from Panasonic Sony pgz optics lumens NewTek but there are many more that are available on the market now the ones that we have in the office here are special because they actually have a V Max control for these certain models which is something that we'll go through a little bit later on now as you can see on these cameras they each have different connector types PTZ cameras can have a vast array of connections some models can even support multiple ways to connect you'll see SDI HDMI USB and a network port as well so there's a connector pretty much for everyone's workflow there are even now nd I hate checks base connections so you can connect your cameras straight into your network for low latency and high quality video for your live production as we mentioned before you can control certain PTZ cameras directly within V mix over the network this is available in the 4k and Pro editions so now we're going to go into V mix and we're going to take a look okay so I have my basic setup here today Homer according my main output here and I've got another camera up here as well as you can see in a bit of a multi view with my green screen for my backdrop and my microphone those type of things so it's just kind of a basic production that we've got set up so now I'm going to go through and I'm going to add my PTZ camera I'm going to get my camera and I'm going to go to the section that it's oh sorry I'm going to go to the capture card it's plugged into which is this aja input to now we have actually connected the camera via SDI so that's what we've got connected here and we're going to click OK so as you can see now it's coming to our production and we have our camera going in via SDI into a capture card into this production here ready to use so one of the things like we mentioned before you can actually have multiple connections from this particular camera so this is a PBS the optics camera which means that we can connect as an SDI connector HDMI connector and because there's a network port we can also use an IP stream from it or we could use ndia checks with their upgrades which are probably available now if you're watching this in the future but they're coming very soon so as it's got that network port for IP streaming in India HX it also means that we can control it over the local network so we've been built in the ability to control those certain cameras within vmix directly over the local network so we're going to have a quick look at that now so we've got our camera input here it's been connected to our AJ a capture card here via the SDI port so if we go into the settings here now the little cog icon will open up the settings for your input so as you can see here we could go ahead and name this so we've given that a name and that type of thing but as we go down the left-hand side here we can find a PTZ section so we'll click on the PTZ section now what that does is the PTZ section here is where we can control it directly from our BMX interface so first of all you will need to select the device type so we've got a PT z 12x camera here so we are going to select PTZ optics this guy UDP so depending on what camera that you've got will depend on the connection for the device type so say we had our Sony plugged in or a Panasonic plugged in we would need to select those protocols when connecting if you're not sure about that you can check out our website or you can check with the manufacturer as well the next thing you'll need to do is work out the IP address for the camera now typically when you buy a PTZ camera you will get a utility with it that will allow you to connect and assign an IP address so we already know what our IP address is for this particular camera so we're going to plug that in so that's a local IP address that has been assigned to this camera again if you're not sure check with your manufacturer how to find this out then we just need to click connect now as you can see all of these buttons here are now available once we've connected so directly from vmix we can now start controlling the camera so we can move it up down we can move it all around we can change the speed in which we're moving we control the zoom as well we control the speed of the zoom if we want to so we can do a lot of different things all of these functions in here are mapable within our shortcuts as well so instead of just using this interface here if you wanted to use your own controller you can set that up as well which we'll go into a little bit more detail soon now you'll notice on the right-hand side here there's a focus section unfortunately the focus section is only currently available for Sony visca over IP so it's not available in this particular connection so just keep that in mind as well so that's available for the Sony cameras and the new tech PT z1 which connects in the same way now we're going to talk about the ways you can control your PTZ camera in phoenix with shortcuts now if you've used vmix before you'll know that we have over 300 shortcuts that are available to you to use just by pressing a button so you can press a button on a keyboard on any midi controller x keys or even an xbox remote to perform a function in v mix so that could be anything from to a camera starting recording and streaming or anything you want to do in your BMX production and the PTZ controls are no different so we're going to show you how to set that up now okay so to access shortcuts in V mix you can go down the bottom here and click Edit or you can go to settings which will bring up this window and then you can click shortcuts now down the bottom you'll see an add button so if you click the Add button it will allow you to assign a shortcut to a key on a keyboard MIDI control or X Keys device so now we're going to select the key so we can just use the a key there's a drop down menu for keyboard keys or you can click the find button which will help you find a button on a keyboard or in a mini control X keys or Xbox so we're just going to select a just for an example quickly now in the function menu this is where you can choose what happens when you press the key so if we go down and we select PTZ we can choose any of the options that we have available to us in the PTZ controls so that's anything from you know creating an input that will be showing you next we can creating shortcuts to move it around now down down left down right so everything that you saw on the control panel in the PTZ options so the little angles to move them to different locations you can choose a button to move them there's a home button so you can move that back to Center and I ends oming and that type of thing as well so these are all available in the function so we're just going to select home for an example now for the input we can choose to use the preview but we can set it also to active hover we could go to the cameras s what we're going to do we're going to select this particular camera to do the shortcuts on we can give it a title description we can make it a local shortcut which means that the shortcut is saved to this preset it's not saved globally to vmix so when you load up this preset this shortcut will load up so you want any more information about our shortcuts video sauron shortcuts you can check out the video on youtube now finally down the bottom showing web controller now if you tick this box it means that the shortcuts available on the vmix web controller again we have a V Max web controller video as well if you'd like to check that out but in short what it does it is allows you to load up a browser on a tablet or an iPhone or something and allows you to control vmix from that so you can set up shortcuts for your PTZ cameras and you could have somebody sitting in the audience controlling the camera just connected to the network and pressing buttons to say up-down left-right zoom in zoom out so that's a pretty cool feature if you want to use that so we're just going to click OK now as you can see when we press the a button it's going the PTZ camera is going to move to the home section and it's going to work on our ptzoptics camera so we're gonna click ok down here once we've set that up we want to add it let's click OK now we're just going to go back in here we'll move this around and then what we'll do is we'll press the a key right here and it will move back to our main area so if we go back into the shortcuts again now one of the things to keep in mind when setting up shortcuts is that when you say press a button to move left it needs to know to stop because the function just goes left it doesn't automatically stop so it's a little bit difficult on the keyboard you would need to set up a key for movement and a key for stopping as well however it's a little bit easier on a MIDI controller or an X keys and I'll show you how to set that up now so I have got a giant MIDI controller set up here well there it is and so if I press a button on it I'm gonna press this button here now because I'm holding it down it has a different velocity so I'm holding it down to 127 we'll click OK and what I'm going to do is I'm going to go to the PTZ options and I'm going to say move it right so I'm going to use that for my camera and then I'm going to click ok down the bottom so if I press the button now it's just going to continue to move the camera right which is not really what I want what I wanted to do is I wanted to stop as well so what I can do is I can go to add again fine and I can press the same key but I'm not going to hold it down so when the button is pressed it's going to move and when I release it it's going it to stop so PTC and then I'm going to select the move stop function so it stops the PTZ movement I'm gonna select my camera and I'm just going to click ok so now when I preview it's on the same button it's using a different velocity so when I push down it's going to move and when I push up when I take my finger off it's going to stop so let's try that out now so I'm gonna push down this button here hold it down and then lift it and it stops hold down let's done so that's something that you can use when you've got your MIDI controller or an X Keys like the X Keys joystick you can have the center to stop you can move it and then stop so that's that's an option so yeah so as I alluded to you can use MIDI controllers you could set this up to go up down left right you could do all sorts of stuff with it on the buttons and you can also use something like an X Keys joystick that we have here so you could set up the joystick to move the the camera around and then you could use all these buttons here you know for zoom for cutting to cameras and all sorts of stuff in your actual production as well so you could set up a production so switch camera start streaming recording titles and stuff on these buttons have a couple for PTZ and have joystick movement as well for the camera so those were some quick examples on how you can use any MIDI controller X keys or your keyboard to control the PTZ cameras in vmix now another cool thing is that we have the ability to use an Xbox remote for it so you can use an Xbox 360 controller an Xbox one controller we use the hardwired USB ones for our production and you can use these to control your PTZ cameras in your production now these work similar to any other MIDI or X keys so you can actually use other buttons here to control your production as well so use the joysticks for the cameras but use a couple of the other buttons to switch cameras overlay titles start streaming and recording too so we're going to go to the shortcut section in V mix we're going to go to edit now you can see the ones that we've already set up for those MIDI controllers I'm just gonna click Add to add another one now we can move these joystick click find first and we can move this joystick around to set any PTZ option we can press the buttons anything we want to do to add a PTC function to it however we're going to go out and actually use a template so we have some templates built into vmix for certain things so we have this 4 and Xbox controller so as you can see we've got the left or the right joystick here is used for all of the camera movement and this other joystick here is used for zooming and that type of thing we have a couple of buttons here that can be used as well so you can have a look at this if you want to use this you can click apply and this will load up all of these shortcuts onto your Xbox controller now again you don't have to do this you can then go in and edit them however you like it's just an easy way to add a lot and use it in the templated way so what you can do then is you can start using it in your production now these are assigned to a preview again you could set these up you could edit them to assign them to a different input say a specific camera but what a lot of people like to do is is they like to move the PTZ camera into the preview and then that way they can use the controller to control the preview and then switch it when it's ready so I'll show you how that works now so we'll click OK to add those and so now as you grab my Xbox controller and I start moving it around like so so we've got the this joystick here moving it left and right and then we have this one to zoom in and zoom out and then I could set other functions to different keys as well I think that's the HOME key so we can zoom that back in and move it around ok so that's how you set up your Xbox controller so a lot of people have them lying around so you've everyone lying around and plug it in and try it out with them it's a really cost effective way to add control to your production now there are other ways to control a PTZ camera different manufacturers will provide hardware that you can use to control them and that type of thing so there's a few different ways there's also ways to control them via web interfaces so this is the PTZ optics example of a web interface where you can actually connect to the camera you can make changes to color brightness math type of stuff as well as make changes to where the camera actually is and different information about the camera so I can use the web interface as well to move things around so that's something else to consider for camera control so one of the cool features about the ptc functionality in vmix is that you're actually able to create different camera angles from the one camera so that's the beauty of a PTZ camera so in v-max you can go through and you can create all these different camera angles and different shots and add them as their very own input in vmix just like you had 810 different cameras and that the cool thing is is that you can set up shortcuts on your MIDI X keys Xbox controller to then switch to those if you want to use a shortcut obviously you can just click to it in the remix interface but you can also use shortcuts for that as well so now we're going to show you how to set up these different camera angle presets in V mix okay so preset shots allow you to create multiple multiple camera shots using the PTZ presets on it so I move a camera I can set it to that shot move it to a different point set it at that shot so within your show you can just click on the different preset shots and the camera will automatically move to those shots for you which makes it really easy if you don't have a an additional camera person to create multiple angles multiple zooms and shots from your particular camera okay so now we're going to show you how to set those up so what I need to do is go to the PTZ section again I can move it around where I want to so say I want a close-up of let's say the cameras I can set that up to that particular point and then I click create input at this position so that's going to create that input then I can say move back to the home area you can move this around to this side doesn't I can click create input so now I have two additional inputs created now if we take a look at the interface now we've also got the setup so we've got our main camera which is our peaches the optics camera here but then we have another two camera angles that we can use in our production so you may want to rename these to make it easier for you to recognize so we could call this Kam's probably and then we can call this one right because it's right of things kind of in a way so those are the shots set up now so what if what happens is I click on our main camera then I click on this shot here it will move to our shot that we have here if I click on this one it will move back to that so that's how you can set up multiple shots within vmix just from the one camera and then switch between them as you need to now another quick way of doing that is by going to the PTZ camera you've got setup and then right clicking the gear icon and then creating an input at a particular position so if we go to the etz section we move it around a bit put it over here I don't have to necessarily create input here I can right-click it here and create an input at this position so that's another way of adding a camera shot to it and then you can go in there and you could rename it as well so that's how you can create different inputs or different camera angles from the PTZ camera in Phoenix move the camera to the right position that you want you don't have to use the interface you obviously you can use your xbox controller or however else you controlling your camera and then you can set the different positions and then save them in vmix so you can use them next time okay so we've shown you how to control the camera and how to connect to SDI HDMI and that type of thing but now we're going to go over some other ways to connect the video and audio from your camera now recently ndia checks has been available on certain cameras so it's built into some cameras and some you can upgrade as well so NDI allows you to add video and audio over a local network using the NDI standard which for those that know we're pretty big fans of and it's a great way to add stuff to your production now you need more information about that you can check it out on our website or watch any of our other videos so basically if I go to add input I'll be able to see any NDI available things on our network so we have this awh e-40 camera which is this camera right here which is Panasonic and that's got some firmware upgrades so it works with NDI so if I click ok then I'll be able to bring in this camera directly into our production so that's one way that you can bring it in again that's using a single cable so it's been powered via power over ethernet and then it's bringing the video signal as well of our MDI HX now in order to control it we still need to use the PTZ options here so if we select the Panasonic option and I believe that's the IP address for it and we can connect up this camera and move it around as well in vmix now there are some NDI controls for PTZ but currently they aren't able to perform the same functions as the v-max positioning and different functions that we use for the v-max so unfortunately it's not supported at the moment if that changes in the future we can then add that to v-max and probably another would be another video about it but most of these cameras will support even though they're ndia checks they will probably support one of the protocols we have Envy mix for example the Panasonic one the the new tech one has supports Sony visca over IP and then PTC optics ones supports the PTC optics connection as well so there are a lot of lot of ways to to actually control the PTZ camera without using the NDI HX controller so most PTZ cameras will actually allow you to send an IP stream from them via RTSP so not only can you have you know the hard wired connections STI hdmi USB and the o HX now with some of them but most of them will allow you to do an RTSP stream that can be picked up in V mix so we're going to show you now how to send that from a camera so we've got our Panasonic camera here and we're going to go to add input and then we're going to go to stream now we're going to select the VLC down the bottom here as we can add a bunch of different types of streams and then you're going to need to know the IP sorry the URL for the RTSP from the camera now you can check with your manufacturer to see what this URL is going to be so this Panasonic camera is then going to push out the RTSP video from the camera into our production so we're just going to click OK here as you can see here that's video is now coming in via an RT SP IP stream into our video production okay so one thing that I did want to cover is how to best use a PTZ camera if you only have one now PTZ cameras are designed in order to switch between their shots and maneuvers as quick as possible so if you set multiple preset camera shots as inputs and vmix it's going to try and move to them as quick as it can so we have added some things in remix to control the position speed here however most cameras will ignore this and the cameras that it does work with only works with the pan and tilt and the zoom is still really quick so unfortunately there isn't much we can do about that we've tried to add some things in there but unfortunately it still looks a little bit weird unfortunately it's just how PTZ cameras work so what we recommend doing is setting up a second shot in your production so if you've got even just a webcam that you could use a wide-angle shot for a GoPro or something like that or you could even use just a still image maybe it's still image with some text that you could cross to before making the changes on the camera so I'll show you what I mean by that so let's just say we have this camera shot here we want to change the camera angle we could switch to our our webcam or a wide-angle shot and then we could go ahead and we could make changes to that and then bring it across so that's just a way to be able to not show the movement of the camera transition and then transition back to the shot that we want okay so that is a lot of information regarding PTZ control in V mix different connections for PTZ cameras how you can use the controller how you can bring in a stream how you can use nd ihx with these cameras so finally we do have a list on our website regarding all of the different specific PTZ cameras that are directly controllable in V mix now obviously there are other PTZ cameras that will work you just plug them in via SD our USB however else you want to buy there are only certain ones that are controllable via V mix it's quite a big list we have a lot of the popular different models that are available to be purchased so we have you know Panasonic Sony Peters the optics lumens NewTek Sony if I haven't already said that so we have a lot that are available that work directly within vmix so here is a list that we have on our website you know you can go to our website to check out a little bit more later on those specific models now some people ask us well why doesn't my old camera work or why doesn't this work it's because in vmix we need to be able to control it over a local network so it definitely needs to be you know web enabled and all of the models that we have on our website are and we are able to work with them over using a specific protocol so that's why those ones are on our website and other ones aren't now if you have any questions at all about PTZ control PVC cameras and that type of thing feel free to send us an email via our website there's a support page with an email that allows you to send us an email with any questions that you might have and don't forget to check out the website with the PTC cameras on it because it's very important not to just rush out and buy one but if you want to control it in vmix definitely check out that list and and try out one of those cameras now another thing to keep in mind is that the veneks trial that we have if we have a free 60 day trial and that is for the pro edition so if you want to try out vmix with your ptc cameras you can use that trial for 60 days for free with no watermarks and test it out with your PTZ cameras in your productions again thanks for watching this video today if you have any further questions email us check out our forums and our website as well so we'll see you on the next video and um catch you later click to watch another exciting V mix tutorial [Music]
10. Canon PTZ Cameras for Churches | CR-N500 & CR-N300 In-Depth Review
Jeff I have an apology to make you do have an apology to make about maybe 12 18 months ago probably you know what Jake let me tell the story okay okay this is what happened we were looking to renovate this beautiful space that we're in right now and I went to my buddy Jake expert of all experts Church front glory and I said Jake let me tell you about what we're doing here at Wellspring told him about the whole project and he said but wait what are you guys doing with video well you know we're not the church to have these like big pedestals with cameras on top of them with people running the cameras every Sunday but we want to have a good looking robust live stream so I think I'm gonna go with a PTZ option and let me just tell you guys if you've never seen Jake Gosselin of church front Hulk out it happened I was upset I was disappointed I think he went all the way of of asking me how I could even consider wasting donor money by buying PTZ cameras I think I just say that I did ptzs are notorious for looking like security camera footage small sensors grainy dark Arc no depth of field bad color that's why I never like PTC cameras but Jeff I've changed my mind this is the Canon CR n500 this camera is the reason why I changed my mind about PTZ cameras for churches in this video you'll learn why first we'll talk about the technical specifications of a camera that results in this beautiful image then I'm going to walk you through the multi-camera setup we've been using at South Fellowship Church using four of these PTC cameras finally we're gonna head on over back to Wellspring church with my friend Jeff he is going to share what it's been like using these cameras for over one year let's dive into the specs of the crn 500 it contains a Canon 1 inch 4K UHD CMOS sensor what's the big deal about a bigger sensor well it has larger photo sites that capture more light meaning there's less noise especially in low light situations this camera also uses over sampling HD processing taking full advantage of the 4K sensor to generate stunning full HD video it has a 15 times optical zoom lens with a bill built-in ND filter in Optical stabilization this lens and sensor combination means you get a cinematic depth of field especially when you zoom in on your subject finally this camera also has Canon's dual pixel autofocus with face tracking making it incredibly easy to capture Sharp Images here's a sample of me walking into frame and putting that autofocus to the test the platform where I'm standing is about 60 feet away from the camera at the back of the room here's what it looks like when the camera zoomed all the way out you've got a really nice wide perspective here it is zoomed all the way in the footage you see now is 1080p at 29.97 the video signal sent out of the SDI port on the back of the camera to our video switcher and then recorded locally with a hyper deck in the prores 422 format this is the Canon CR N300 it's the little brother to the crn 500 it has most of the same features the primary difference being a smaller image sensor it has a 1 over a 2.3 inch CMOS sensor with a 20 times optical zoom meaning it can reach farther than the n500 but is not as good in low light because of that smaller sensor let's compare the difference here's a tight shot of me on the n500 that has a one inch sensor at a 15 times Zoom here's a tight shot of me on the N300 with the smaller one over 2.3 inch sensor at a 20 time zoom finally this is the Canon RC ip100 touch screen PTZ joystick controller it can control the pan tilt Zoom exposure and other settings of up to 100 cameras the joystick is very accurate and responsive with enough practice you can make one camera operator on this controller look like you have four or five camera operators depending on how many cameras you have within your setup you can easily recall position and exposure presets for each camera or you can even use the cool Trace feature to pre-program precise movements for each camera our setup process us for using these cameras at South Fellowship was quite simple each camera needed power a network connection and an SDI video connection to our switcher the network port on the back of the cameras does have Poe or power over ethernet so I did not need to use the included power supplies it got power from the ethernet cable keep in mind you have to have Poe compatible switches to make this possible the next thing we did is I talked to Aaron about what IP addresses were available on our local area network that I could assign to these cameras it's very important to have IP addresses that you can dedicate to each one of these cameras and your controller because for all the cameras I'd recommend using the manual IP option it's going to ensure that every time you turn on and off your system when you turn it back on again you're going to have those cameras assigned properly to your controller with the right IP address so it's important to get the it right once the cameras have power Network and video connections I went ahead and and downloaded the camera search tool on our video control computer that has a hardwired connection to the same network upon opening the camera search tool app I found all four PTZ cameras on the network by default they are all automatically assigned an IP address but this is where I can select the IP address to open up the camera settings in a web browser to start configuring the camera to my liking first I set up a manual IP address and then I let the camera reboot to apply that change next using the new IP address I can navigate back to the camera settings in the browser to change the frame rate frequency to 29.97 and resolution to 1080p so that now it's compatible with our video switcher and the camera shows up in our multi-view next I'm able to start creating exposure and position presets for the camera using the web browser control app I find it easiest to use the web browser in a laptop to adjust the position exposure and saving presets because my come computer monitor becomes a great reference monitor to see what the camera is seeing then later on when I register the camera in the RC ip100 controller it's much easier to call up those presets and do on-the-fly movements with the Controller joystick and zoom toggle registering the camera with the controller is easy first I wanted to make sure that I knew all my naming assignments for the various cameras like camera One camera two camera three and I know which camera is which I want the numbering of the cameras and the controller to actually be consistent with the same number and naming scheme we have with the cameras in our video switcher so then when we look at the multi-view and I see camera one I know on my PTZ controller that's the same camera one so on the controller I simply click on the settings button the network camera registration and then on the manual IP under the camera Group 1 I select camera one and I sign the manual IP address I registered earlier for the camera it also gave me peace of mind to know that I could secure the control of these cameras on the network with you unique usernames and passwords to make sure that nobody maliciously takes over a camera even if they know the IP address because theoretically anybody on that Network could pull up the IP address in a browser and then they could control the camera if they have the password so I went ahead and I repeated this process for every single camera another cool feature mentioning about these cameras is that it has built-in ndi compatibility maybe you'd like to do all of your video switching and streaming in a simple setup using propresenter well within seconds I was able to go into the settings on the camera in the web browser and I enabled the ndi feature and then I went over to propresenter running on a computer that's also on the same local area network I made sure Wi-Fi was off because you don't want ndi to be going over Wi-Fi it could be kind of laggy and glitchy make sure it's just on a hard wired Network I went into Pro Presenter I went to preferences I went to inputs and then I added a video input and then from the list of devices to to choose from voila a new ndi device popped up for each of these cameras as you can see these PTZ cameras easily integrate with a large hardware-based streaming system or a simple software application like propresenter now I want to talk a little bit more about the camera plot that we're currently using at South fellowship and how I've arranged these different cameras Canon sent me two crn 500s with a bigger sensor and two crn300s with the smaller sensor they also sent me a Canon C70 in order to produce this YouTube video and they wanted to show me how well the color matched between the C70 cinema camera and these PTZ cameras here is a look at the camera plot camera one is a crn 500 placed at the back of the room slightly off center from the stage this is our main follow camera 2 is a crn 300 placed at the side of our Tech Booth which is also in the back of the room this shot gives us a variety of angles including a great wide shot of the entire room and tighter side shots of the stage camera 3 is a Canon C70 cinema camera that gets a nice stationary shot from the side of stage left I usually have it framed in on our worship leaders and despite being a cinema camera a completely different model than these ptzs it blends perfectly with them because they all use the same Canon color science and they all are using the rec 709 Lut camera 4 is another crn 300 with a smaller sensor placed on the floor in front of the stage right and it gets a great close-up shot of our drummer and bass player or a wide shot of both of them together finally camera 5 is the other crn 500 placed in front of stage left for close-up shots of the piano and electric guitarist as I already mentioned our video switcher is Blackmagic atem running at 1080P and 2997 frames per second we are streaming at that same frame rate and resolution to our church website YouTube channel and Facebook page using a box boxcaster Pro encoder which uses h.265 encoding maintaining High Fidelity audio and video for our online viewers I want to emphasize the importance of having a high quality encoder if you're going to invest in quality professional cameras like these Canon PTZ you also want to make sure you have adequate stage lighting even though these are high-end cameras they still need sufficient light for your subject so then you don't have to crank the gain or ISO on these cameras and it gets all noisy and grainy we've used this setup now with five Canon cameras and the controller for over a month now and our team could not be happier with the results and you can look at our live stream for yourself we've been able to borrow these cameras at South Fellowship from late August 2022 to the end of October 2022 so if you're watching our stream during that time frame those are the cameras you're seeing in our worship center there's no noise or even hardly any noise on the smaller camera sensors even in the darkest parts of the image the skin tones of course look great because it has the amazing Canon color science and I did make sure to spend some time dialing in all the cameras to the same in the proper white balance so the skin tones look natural I love having the bokeh effect with these PTZ cameras I never thought that was possible with PTC cameras until I tried these ones where we're able to zoom in tighter on a subject and you actually have that effect where the background gets blurred out the autofocus is very quick to find faces with that face detection feature and lock it into Focus the only time it struggles is if there's like a complete blackout with lighting but that's going to happen with any camera with autofocus it needs light to work I was able to teach our volunteer video directors within minutes how to operate these cameras how to change the exposure if we need to how to save presets it's all very intuitive with a controller during rehearsal our volunteer video directors take their time dialing in all of the presets for the various camera so that they have all the tweaks made for different band members someone might be taller or in different location on stage we can tweak the presets save them then during the service they're calling up the different presets and they're switching the camera angles with the atem we have a stream deck right next to the Canon controller so it's very easy for one person to control the cameras and switch the camera angles simultaneously maybe in an Ideal World if we had another volunteer for that position we could separate those two roles and a person could be more creative with their attention on the pgz cameras while the other person can focus on Switching the angles I spent two Sundays in that role myself just to get a great feel for the cameras and what it's like switching at the same time and I had a blast my favorite technique would be to actually pan one of the PTZ cameras before cutting to it so then I cut to it mid motion it really adds some nice energy and motion to the shot and then I would cut away to a different angle and I would try this out with different cameras Maybe camera 2 which was in the back of the room to get a nice pan across the stage sometimes I would use camera four or five to pan across the drummer and bassist or my pianist and my guitar players we also used our primary camera to follow our pastor during the sermon since you can adjust the PTZ joystick speed for panning and tilting and zooming it's easy to follow someone as if you're operating a full camera tripod setup but you're doing it all on this little joystick so far after more than a month of using these cameras week in and week out and really just honing our own skills of how to make the most of this tool I could not be happier with the results we've been getting let's head on back over to my friend Jeff's church over at Wellspring up the road to get a closer look of how their experience has been using these cameras for over a year let's go ahead and walk through kind of how you've placed your cameras so what you're looking at right now here is our kind of one moving camera so obviously we've got it on a tripod plugs into a floor box we've got SDI and network in all of our floor boxes all over the stage so Any Given Sunday you'll see this in a different spot sometimes it's here sometimes it's over on that side sometimes it's back behind the drums and that just allows us to kind of have one unique perspective on our live stream that's moving around while our other three cameras are fixed so if you take a look out this way there's one camera here on the right wall One camera over here on the left wall and then there's one camera in the very back by the sound booth and those never move from their location so the way that we placed them was we really just wanted to be able to capture anything that's going on on this stage if you look at our baptismal over here the camera on stage right side hits the baptismal perfectly so this was a something we really wanted to have a good shot of when we're baptizing folks what's cool about that is we actually take that feed from that camera and put it up on the LED wall when we're baptizing somebody so the whole room gets to be in on the baptism experience even if you're really far away in the back seats you get to see it up close so we get a crystal clear image from that camera the baptismal this camera kind of does the same it crosses and gets everything on this side of the stage and then we've got our main straight on shot dead center in the back so you guys have a really nice clean setup here with this yeah so we're going straight SDI out which gets patched in downstairs and directly into our video router and then into our video switcher and then this network cable is just directly tied into our Tech Lan Network in every floor box we've got video ports we've got Network ports and we've got microphone XLR Jacks all right now we're off to the control room so you guys can see how the i o works at the rack down here and then how we are controlling the camera so here we are in the server room with the rack that contains all of the networking i o as well as the videos on the back of the cameras when we saw those SDI cables and networking cables they are coming down here so they've got the atem 2me Production Studio for 4K as their primary switcher and then out here in their control room they have the control panel for that switcher right here so that's what's cutting to the various camera angles from this space we run all of our propresenter from here we run our video switching from here and we run our camera movement from here the way we built the rig is that cameras and video switching can be run by one body although we prefer it to be two people that are sitting down here one person doing the switching one person doing the camera operating do you have the person switching is just calling out like what they're gonna cut to like to the person next to them who's directing cameras like what's the what's that actually look and sound like yeah so we kind of put the person that's sitting at the video switcher as the chief boss down here and that person is letting the camera operator know what's coming next that person is letting the propresenter operator know what's coming next so oftentimes it's like this person will be sitting here and saying oh there's a scripture reading coming up in about a minute at the end of this next song and so then the camera operator will take camera three and get it just positioned at the scripture reading way ahead of time and so then camera three just sits there they can still move around with the other cameras for the end of the song and then we get to scripture reading video switcher person says all right we're going to camera three for the scripture reading and then they just take it and then just like what I've been using at South Fellowship they've got the RC ip100 controller super pleased with this controller I've used a couple of different PTZ controllers over the years and this one is by far the most robust and capable in terms of being able to swing cameras around at different speeds pull up presets at different speeds there's some great hot buttons over here on the side that you can assign to do whatever you want them to do so for example if you have a very different lighting set we have all of our settings exposure white balance everything like that on manual mode on these cameras so we set it and then we have to set it to something else if the room changes for us the way that that manifestes every Sunday we have similar Lighting on the spot for the preacher kind of like what you were saying Jake like just get your lighting right and then you're good on very rare occasions we'll be doing a service like on a good Friday or Ash Wednesday or Monday Thursday where the lighting like dramatically changes and we want it like dark dark and then light and then dark again and so what the way that we compensate for that in this system is in the camera presets you can choose if you want them to if you want the preset to store your different settings with exposure and white balance and all of that so for those Services as we move through our presets on the camera we'll have like a set of presets that are for the dark mode and a set of presets that are for the light mode and the second we hit the preset for the light mode it'll actually flip all those settings on the camera and make it look just as good but quickly in like a preset fashion as opposed to having to go in and you know manually adjust all those settings for a change in the middle of a service so what you're seeing here is if I go from preset 4 to preset three it's going to be real Zippy it's going to do that as fast as it can do it because it's at a speed level of a hundred percent so the camera's saying get from this point to this point as fast as you can but with this programmable user button right here I can click this and now it's changed it to a time-based transition of 99 seconds so now when I hit preset three you can see that back camera now is just barely crawling and it's going to take 99 seconds to get from point A to point B can you start altering other cameras right now absolutely so I can now go to camera three and I can change that and have that go right there and that starts moving and if I want that to go quickly I can change that to speed level 100 and you can see now it starts to buzz around quick while the other camera is still doing its movement and so I can have multiple cameras doing these beautiful slow pans from one place to the other that really emulate somebody actually being on the camera and it just keeps going I mean camera one still has another minute of that transition left so I can call call back to that whenever I need to so it's just smooth I mean the way the cameras roll in that really long transition it's it's actually a cool a cool way to use this gear this screen is showing you what's going out to the live stream this screen is showing you what's going up to the LED wall so right now they're both getting that stained glass image but if I wanted to send a live camera to the live stream and I wanted it to be camera one I can press me1 and I can put camera one right there camera one is now going out to the live stream if I hit this me2 button and I want to give the people in the sanctuary this close-up view of the baptismal then I go over here to me2 I press camera 3 and I take that and now you can see camera three is what's being sent to the LED wall and you can actually see it in the room it's what's live on the wall so I can like back that off and in the room you get the live video we don't use that very often we're not a live video kind of church in the room the screen's honestly like too big to run iMac behind the sermon it just is like crazy large but it works really well for baptisms when when people want to feel like they're connected to the person in the water Jeff thank you so much glad to hear you're having a great experience with these cameras that I might have warned you not to get but I was totally wrong I just hope that the next time I'm wrong about something which is few and far between but the next time I'm wrong about something I hope I handle it with the humility and Grace that Jake you have handled this very awkward situation with there you have it I've officially changed my mind about PTZ cameras for Church live streaming all thanks to the Canon crn 500 and 300 cameras my personal preference would be to build a system that has all n500s so that every camera angle has a beautiful image because of that one inch sensor but I understand sometimes we are limited by budget nevertheless the N300 still exceeded my expectations so long as your lighting and exposure is set up properly you're going to be happy with the image that this little brother camera can also produce with a smaller one over 2.3 inch sensor a big thanks to Canon for sponsoring this video and allowing us to buy all these cameras for a few months we finally have a PTZ camera solution for churches that doesn't sacrifice so much of the video quality that we all want and that's why I'm thrilled to recommend these cameras to churches out there whether you're a small church maybe you only need one or two of these cameras you could go with the N300 model or if you're a larger scale production that you're really shooting for the best results possible you can go for the n500 check out the links below this video to learn more about this product there's so many specs and features that you can learn about on Canon's website so go check it out yourself thanks for watching hit that like button if you found this video helpful subscribe to the channel for more worship and Tech tips and we'll see you next time [Music]